Initiating an On-Demand Imaging Session
Although most imaging sessions are executed in Auto Mode according to the imaging schedule set in ROCK MAKER, it’s possible to override the Auto Mode and create an on-demand imaging session from ROCK IMAGER®. Follow the tutorial below to initiate an imaging session.
Prerequisite:
- You have added a plate to ROCK IMAGER®.
To image a plate:
- On the Search tab of the Plate menu, locate the plate of interest and select it by checking the checkbox next to it. If you want to image more than one plate, check the checkboxes next to any other desired plate rows.
- Once you select the plate(s), click Image Now in the command panel that appears.
Note: TImage Now feature can also be found on the Schedule menu and Live Image sub-menu of the Imager menu.
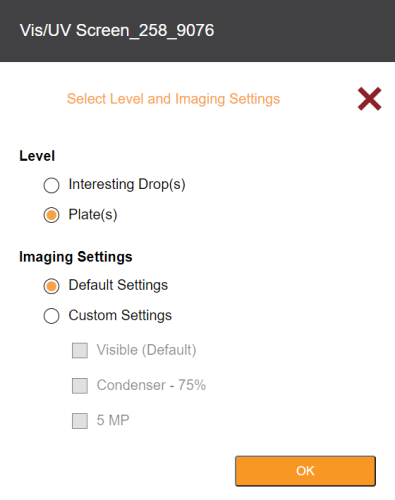
- Then, select level and imaging settings when prompted. Click OK when done.
- Level: Select Interesting Drop(s) to image only drops marked as Interesting or Plate(s) to image the entire plate.
- Imaging Settings: Choosing Default Settings will tell ROCK IMAGER® to use the default settings defined in ROCK MAKER. Select Custom Settings to define new imaging settings for this particular imaging session.
- Once your plate has been imaged at least once, you can view and score images with ROCK MAKER.
Frequently Asked Question
► Why is my ROCK MAKER not receiving any images?
Answer: Make sure the ROCK IMAGER Processor is running in order for ROCK MAKER to receive images. If the problem persists, contact support@formulatrix.com.

