Plate Menu
The Plate Menu is where you interact with the plates inside your imager. It comprises two tabs: The Load Port tab and the Search tab.
Load Port Tab
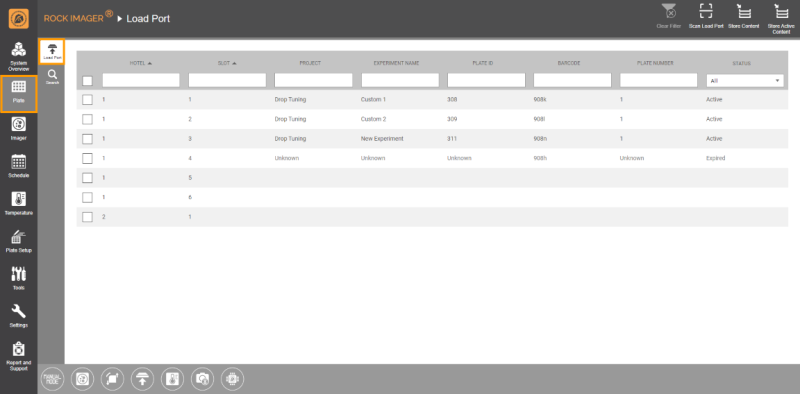
The Load Port tab is available under the Plate menu and displays plate data. Designed to visualize the hardware, this tab depicts the 7 Load Port slots, six of which are for the one-slot-height plates, and the last one is for the two-slot-height plate.
There are four icons on the upper-right corner of the screen.
Item | Description |
Clear Filter | Allows you to reset your search parameters. |
 Scan Load Port | Lets you add plates to the system. After scanning, plates will stay in the Load Port until you give further commands. It prevents delays in manual imaging because you don’t have to move the plate from the Storage. |
 Store Content | Moves all plates to Storage at once. |
 | Informs ROCK IMAGER® to only move plates with ongoing schedules (the Status column is Active) to Storage. |
Tip: Learn more on how to add plates to ROCK IMAGER®.
Search Tab
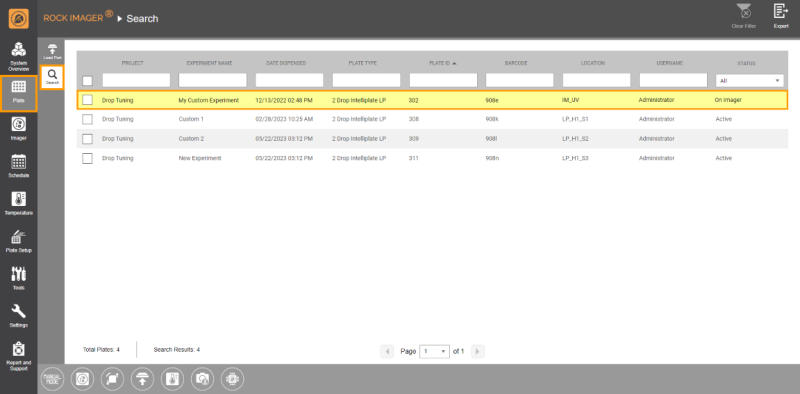
The Search tab allows you to quickly find registered plates inside the system’s Storage facility or Load Port. You can use available search criteria, such as project name, barcode number, and dispense date.
Tip: You can perform a plate search to find out if any expired plates, indicated by the Status column, should be removed from the system.
There are two icons on the upper-right corner of the screen.
Item | Description |
Clear Filter | Resets your search parameters, |
Export | Saves your search results yo your local computer |
Command Panel Options
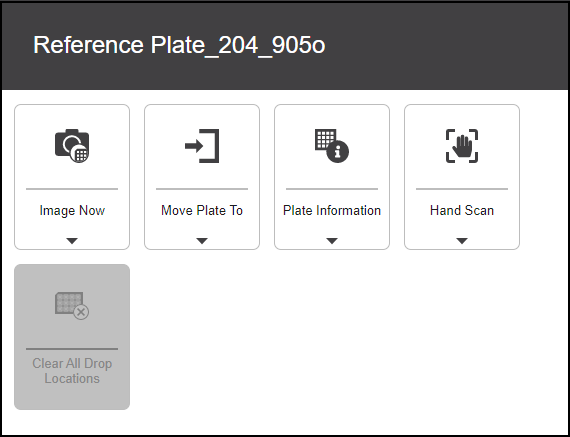
A command panel offering five options will appear if you click on any plate row on either the Load Port or Search tab.
Item | Description |
Image Now | Allows you to image a plate immediately. Learn more about Creating On-demand Imaging Sessions. |
 Move Plate To | Moves the selected plate(s) to Storage or Load Port. You can also move a plate to imager(s) if you want to inspect its content. |
 Plate Information | Displays plate information and its imaging schedule.  Plate Information (Left) and Plate Schedule (Right) |
 Hand Scan | Available only in the Load Port tab, Hand Scan lets you manually add a plate to the Load Port by inputting an experiment's barcode. |
Clear All Drop Locations | Clear All Drop Locations resets a drop location on a per-plate basis in case drops grow beyond the original size. Note: This option will be unavailable if your current plate has no drop locations. |
The Plate Status
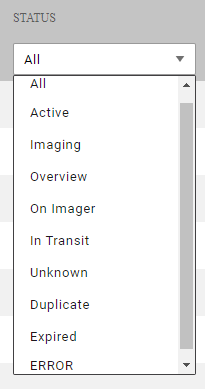
The Status column in the Search and Load Port tabs informs the status of plates inside the imager. The drop-down list in the Status column filters the plate’s statuses.
Below are the terms in the Status column and what they indicate.
- All: All plate statuses.
- Active: The plates are active and queued for imaging.
- Imaging: A plate is being imaged.
- Overview: ROCK IMAGER® is trying to locate a drop.
- On Imager: The plate is under an imager.
- In Transit: The plate is being transported from the Load Port, Storage, or Imager.
- Unknown: The plate is not registered in the system. The most common example is that the system doesn’t recognize the barcode number.
- Duplicate: ROCK IMAGER® recognizes two plates with a matching barcode number.
- Expired: A plate has been imaged.
- ERROR: Some plate information, such as the barcode number or plate name, is missing. You can prevent this by double-checking your experiment in ROCK MAKER.
Related Topics
FORMULATRIX® is proudly powered by WordPress


