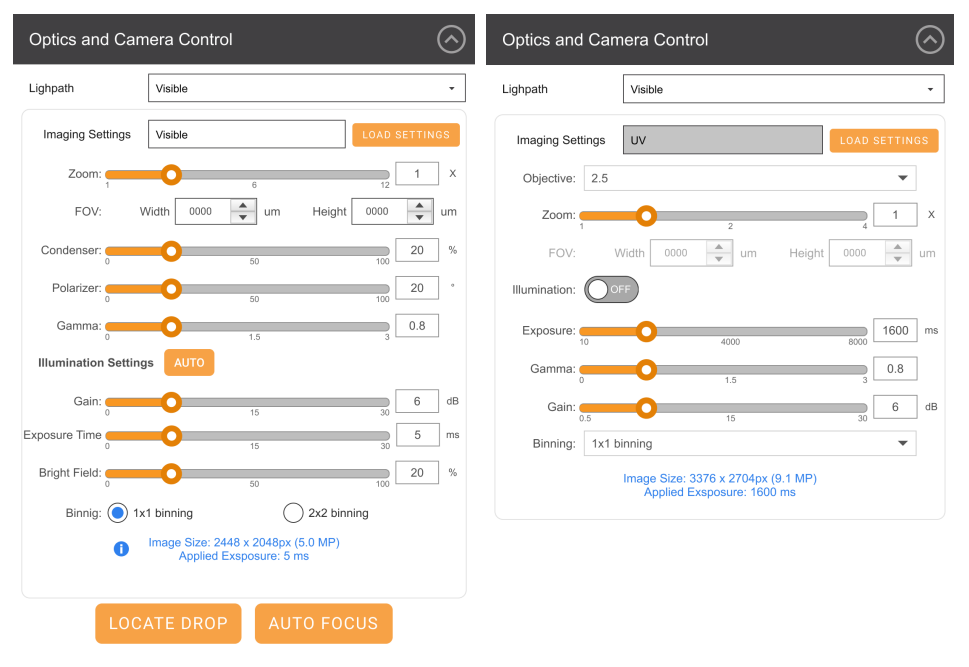
Optics and Camera Control Panel
The Optics and Camera Control panel, found on the left side of the Live Image sub-menu, lets you manipulate the microscope’s optics while viewing a live image. The optics and camera controls vary based on the imaging methods you have purchased.
Control | Imaging Methods | Description |
Imaging Settings | N/A | Clicking the Load Settings button will launch the Imaging Settings dialog box. Here, you can select any of the imaging settings defined in ROCK MAKER to view the live image. This helps you see how the image changes as you switch between imaging settings.  Load Settings Dialog Box The imaging settings are taken from your ROCK MAKER software, and imaging settings can only be modified or created in ROCK MAKER. |
Zoom | Visible SLP Visible UV | The Zoom field is generated by the current zoom setting and is related to the FOV box. These boxes allow you to zoom in on regions of interest within a drop or well. To change the zoom values, drag the scroll bar’s bubble to the left or right to decrease or increase the value respectively. You can also type the desired value in the corresponding box on the right. |
Field Of View (FOV) | Visible SLP Visible UV | You can use the FOV boxes to manually set the size of the image (µm) you want to view. As you change the FOV width and height values, the zoom value automatically adjusts to accommodate them. |
Objective | SLP Visible UV | The Objective box lets you magnify the live image on the ultraviolet lightpath. To change the Objective value, click the corresponding list and select the desired value. |
Condenser | Visible SLP Visible | The condenser collects light from the Köhler light source and concentrates it onto the well being examined. Values range from 0 - 100%. At 0%, the iris is fully open, and a cone of light is concentrated at a wide-angle. At 100%, the iris is closed and the light is concentrated in a column of light as opposed to a cone. Adjusting the condenser value can improve image contrast. Read Visible Light Imaging for more information. |
Polarizer | Visible SLP Visible | This field describes the angle at which the polarizer lens is projecting the light from 00 - 3600. Recommended settings are 0° or 90°. At 0°, you are not using cross polarized imaging. This is the same thing as viewing the drop with only the naked eye, which may make it harder to find a crystal. At 90°, you are using cross-polarized imaging. At 90°, if there is a crystal in the FOV, the crystal will light up due to the crystal's birefringence (if there is no crystal, the FOV will appear dark). |
Illumination | UV | When using the UV lightpath, the Illumination box controls whether the LED UV light source is ON or OFF. Turning ON the illumination pattern makes the live image more visible, while turning it OFF will make the live image darker and virtually invisible. |
Gamma | Visible UV | Gamma affects the contrast of the midtones in the image. The higher the gamma value, the darker the image will be. The smaller the value, the brighter the image will be. Note: When you modify this setting, only the midtones are affected, without affecting black and white. Changing this setting affects both the live image and automatic imaging.. |
Illumination Settings | Visible | If you click the Auto button, ROCK IMAGER® will automatically set the best values for the Gain, Exposure Time, and Bright Field boxes. |
Gain | Visible UV | Gain amplifies signal strength in low light conditions, increases the pixels’ sensitivity to light, and makes the image brighter. Note: Increasing the amount of gain can also increase the noise in an image. |
Exposure | Visible UV | The Exposure box lets you adjust the amount of time (ms) that the camera’s shutter remains open when capturing an image. This determines the amount of light allowed to fall on the camera’s sensor, which affects the image’s brightness. |
Bright Field | Visible | Bright Field illumination passes light through the specimen under the microscope so that the specimen appears dark against a bright background. At 0%, the bright field light is turned off and at 100%, the light is at maximum brightness. |
Binning | Visible UV | Binning and image size information displays the exact size of your image, in pixels. Note: Binning Options depend on the camera you purchased. By default, binning exposure compensation is enabled for all Visible images and disabled for all UV images. If you would like to disable binning exposure compensation, please contact support@formulatrix.com. |
Auto Focus | Visible | Executes the Auto Focus algorithm, which is useful for zooming in on a region of interest. This algorithm determines the best focus level for your drop and displays the results on the Focus Graph sub-menu. Auto Focus settings can be configured for each plate type in the Plate Setup Menu. |
Locate Drop | Visible | Executes the Locate Drop algorithm on the drop currently in view. This algorithm analyzes the drop’s well to determine the exact location of the drop and displays the results on the Drop Location sub-menu. This button is only available if Drop Location has been activated for the plate type you are using in the Plate Setup menu. |
