User Manual – English Version
Warning Indications and Symbols
Caution | Read the manual before operating this equipment. No user serviceable parts. Only qualified service personnel shall service this equipment. | |
Electric Shock Hazard | Danger High Voltage - Disconnect all sources before servicing. |
Safely Unpacking the µPULSE Instrument
Note: Please keep all packaging materials for service and support shipments.
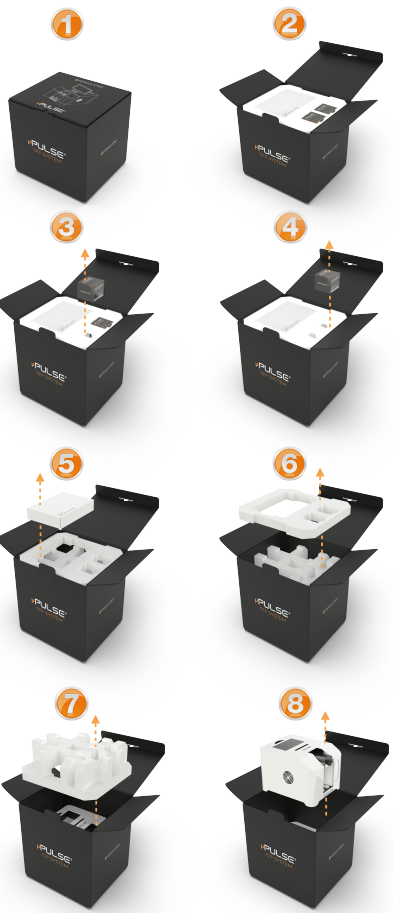
Unboxing The Instrument
Removing the µPULSE Shipping Bolt
Important: Please remove the shipping bolt before operating the µPULSE instrument. Failing to remove the shipping bolt will cause the instrument to vibrate loudly while running, and could affect the performance of your µPULSE.
- Remove the plastic wrap from the instrument, also remove the protective plastic sticker from the touch screen and the permeate collector door window.
- Place the instrument on the edge of a platform or a desk and slowly move it forward until it sits only on its two rear rubber feet (shown below).
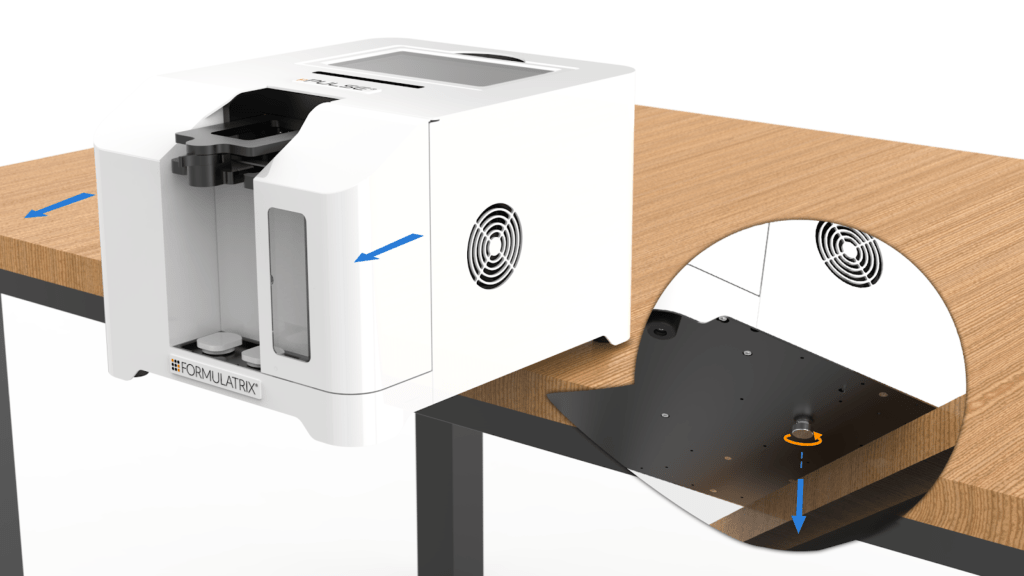
Removing The Shipping Bolt
Important: Hold the instrument firmly with one hand to prevent falling.
- Find the shipping bolt, which is located under and behind the permeate collector door.
- Remove the shipping bolt by turning it counterclockwise.
- Store the shipping bolt in case of future use.
Knowing the µPULSE Accessories
We provide you with an accessory kit that includes everything you need to get started, including:
- 1 - Power cable
- 1 - 125 mL Nalgene bottle
- 2 - Extra set of silicone seals
- 1 - Ethernet cable
- 2 - Transfer tubings
- 2 - Tube stands
- 2 - 50 mL tube adapters
- 2 - 50 mL tubes
- 1 - Permeate collector
- 1 - Cleaning chip
- 1 - 50 gr calibration weight
Identifying the µPULSE Components
Before running an experiment, we recommend that you familiarize yourself with each of the µPULSE components.
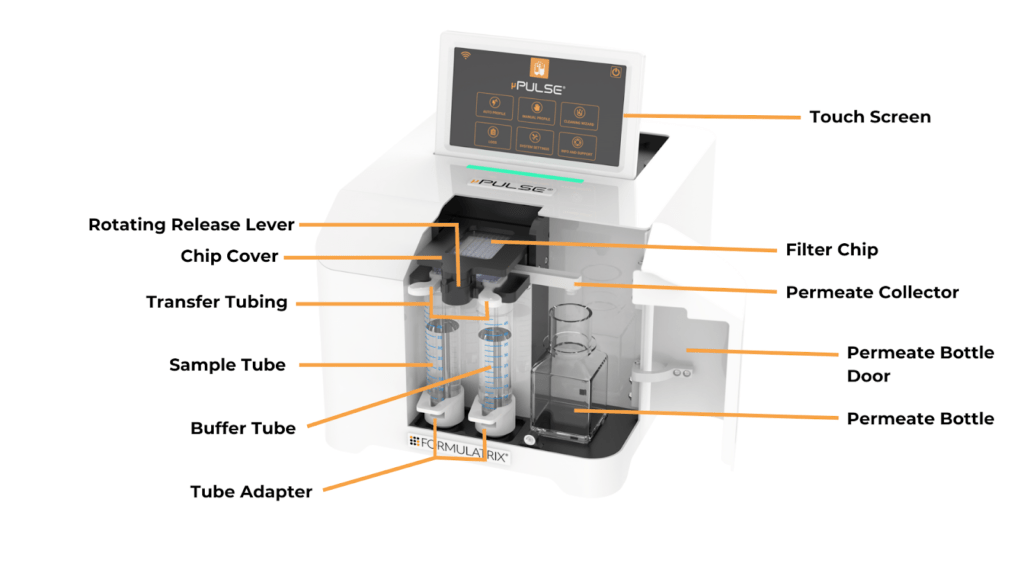
µPULSE Front View
- Touch Screen: The touch screen controls the µPulse software.
- Chip Cover: The chip cover securely holds the chip in place.
- Rotating Release Lever: Rotate the lever from left to right to open the chip cover.
- Filter Chip: µPULSE - TFF System filter chips come with six membrane cutoff sizes: 5, 10, 30, 50, 100, and 300 kDa. Filter chips can be purchased from the FORMULATRIX online store at https://wcm.formulatrix.com/.
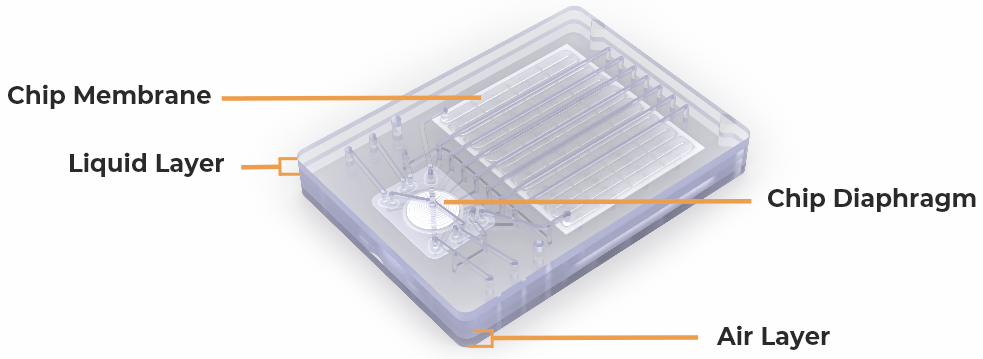
µPULSE Filter Chip
- Permeate Collector: The permeate collector transfers permeate liquids from the chip to the permeate bottle.
- Permeate Bottle Door: The permeate bottle door keeps the permeate bottle covered. You can easily check the permeate bottle capacity through the window in the door.
- Permeate Bottle: The instrument accepts both 50 mL conical tubes (using the supplied tube adapters) or a 125 mL bottle.
- Transfer Tubing: The transfer tubing connects to the chip for aspirating and returning the sample and/or buffer to the 50 mL tubes. It can be single-use or cleaned for reuse.
- Sample and Buffer Tube Positions: The left input of the µPULSE is for your sample. The right input can be used for additional sample or buffer. The system is compatible with all common varieties of 50 mL conical tubes.
- Balance Pad: The balance pad provides a repeatable place for the tube adapter to sit. It detects and calculates volume changes when the µPULSE is running profiles.
- 50 ml Tube Adapters: The tube adapters couple the 50 mL conical tube to the system's balance pad.
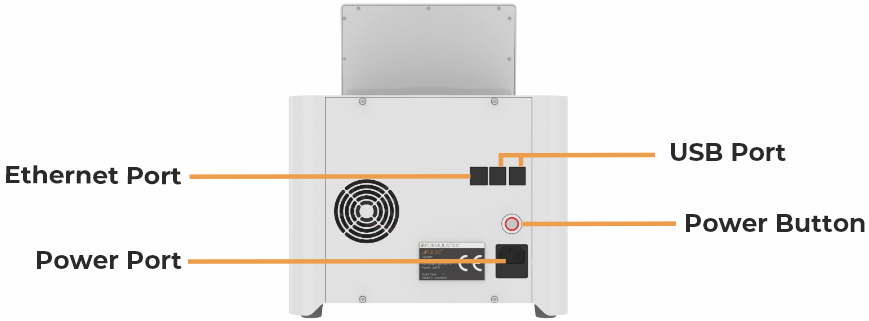
µPULSE Back View
- USB Port: The USB port is used for updating the µPULSE software manually if an Internet connection is not available. It may also be used by support for debugging or troubleshooting purposes.
- Ethernet Port: The Ethernet port is used to connect the µPULSE instrument to the Internet through hard-wire.
- Power Port: The power port is where you plug in the power cable.
- Power Button: The power button turns the µPULSE On or Off. To turn off the device, it is preferred to shut down the system by tapping the SHUTDOWN button
 on the Home Screen. Then, press the power button.
- In the same way as a software shutdown, pressing the power button once will perform a normal shutdown.
- Pressing and holding the power button for more than 5 seconds and releasing it will perform a "hard" shutdown.
Setting Up the µPULSE Instrument
All of the items you need to set up your µPULSE are included in the accessory kit, including the filter chips. Make sure you have everything ready, and then follow the procedure below.
To power on the µPULSE instrument and start the software:
- Connect the µPULSE instrument to a power outlet using the power cord.
- Find the power button located on the back of the µPULSE hardware and turn it on.
Important: If you move µPULSE to or from an environment with a significantly different temperature, turn on the instrument and allow it to acclimate for at least 1 - 2 hours before use. For cold room use (~4C), allow up to 24 hrs for proper acclimation
Activating the µPULSE License
To gain full access to the µPULSE instrument functionality, you will have to activate your purchased license. This will be supplied by your support representative after purchase.
Note: For more details about our license, contact our support at support@formulatrix.com.
Prerequisite:
- You have downloaded the supplied license file and placed it onto a USB flash drive (FAT32 or NTFS formatting required). Then, insert the drive into a USB port on the back of the device.
Note: If you haven’t received an email, please contact our support.
To activate a license on the µPULSE instrument:
- Select from the following options:
- When you turn on the instrument for the first time, a message will appear and ask you to activate a license or wait for later activation. Tap the ACTIVATE button
 and you will be directed to the INFO AND SUPPORT page.
- Go to the INFO and SUPPORT page on the home screen.
- When you turn on the instrument for the first time, a message will appear and ask you to activate a license or wait for later activation. Tap the ACTIVATE button
- Tap the ACTIVATE button
 and select the license activation method from the following options:
- Manual Activation: Select this option if you have purchased the µPULSE license and follow the on-screen instructions. Then, select the license file from the USB and tap OPEN. Please wait while the system is activating your license.
- Trial Activation: Select this option if you haven’t purchased a license. This trial license can only be activated once and it will expire in 2 weeks. After the license expires, the instrument will only run in demo mode.
Calibrating the Scales
Important: For best accuracy, we recommend that you check and calibrate the scales daily. You should take particular caution to recalibrate after the initial install, when transferring to a significantly different temp, or when experiencing volume inaccuracy. Follow the instructions below to check the scale accuracy.
Required materials:
- The supplied 50 g calibration weight in your accessories kit.
To check the scale accuracy:
- Go to the CALIBRATION WIZARD tab in the SYSTEM SETTINGS menu.
- Tap CHECK SCALES button on the CALIBRATION
Note: The values shown on the CHECK SCALES page are live weight measurements of the total weight on the scales.
- If either scale is not reading zero with no weight applied, press TARE to zero the scales. Confirm that there are no major fluctuations.
- To check the accuracy of either scale:
- Place the included calibration weight on a scale and compare the displayed weight to the actual weight.OR
- If a calibration weight is not available, create your own calibration weight by filling a tube with some water and weighing the tube, liquid, and tube adapter together using a trusted scale or balance accurate to two decimals. Place the calibration tube and tube adapter onto the scale and compare the displayed weight to your measured weight.
- If you find any inaccuracy in either sample or buffer scale, proceed to the tutorial below to recalibrate the volume sensor.
To calibrate the scales:
- Tap CALIBRATE SCALES and follow the onscreen instructions.
- The SUMMARY page will appear, providing you with the calibration results for the sample and buffer scales. The Sensor Measurement Weights show the values read by the sensors. Tap FINISH to save the calibration values.ORIf you see a significant difference in value between the calibration weight and the sensor measurement weight, please contact support@formulatrix.com for assistance.
PREPARING THE SAMPLE AND BUFFER TUBES
To prepare sample and buffer tubes:
- Open the chip cover.
- Open the permeate bottle door, insert the permeate bottle, and then insert the permeate collector into the slot over the tubes.
- Fill the left tube with the sample and the right tube with the buffer of your choice or additional sample.
- Put the transfer tubing into position, making sure the 1/16" tubings are inside the conicals.
- Peel off the blue sealing tape from the back of the chip.
- Attach the desired chip with the diaphragm side facing the front of the instrument.
- Ensure that the chip cover closes completely.
FORMULATRIX® is proudly powered by WordPress