Using the Pipetting Parameters
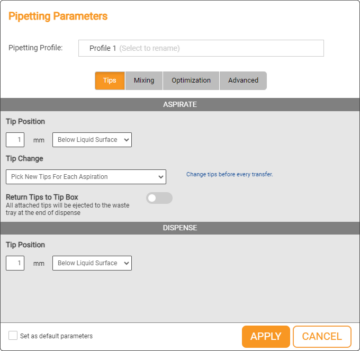
Pipetting parameters are settings you can apply to liquid transfers to define how they should be handled. Such parameters include tip change options, aspiration and dispense position, and other pipetting customizations. A set of parameters can be saved as a Pipetting Profile. When defining a new transfer, you can apply a saved Pipetting Profile so you don’t need to repeatedly define the same parameters.
The system defaults are saved as the Factory Profile. You can also create and set your own profile as the default applied to any new transfers.
This topic covers the following sections:
- Understanding Each Option in the Regular Pipetting Parameters Menu
- Understanding Each Option in the Serial Dilution Pipetting Parameters Menu
- Managing and Modifying the Existing Profile
Understanding Each Option in the Regular Pipetting Parameters Menu
In this section, you will learn about all options in each tab of the Regular Pipetting Parameters window.
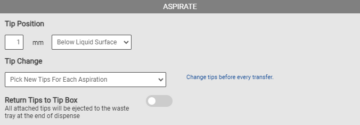
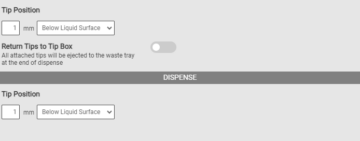
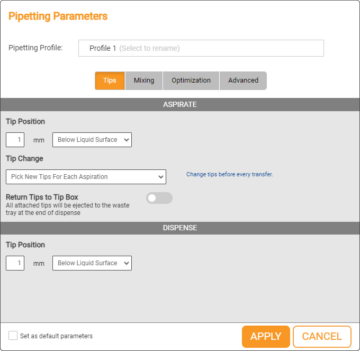
The parameters in the Tips tab allows for configuring tip change frequency and tip position during aspiration and dispense.
Aspirate
Option | Default Settings | Description |
Tip Position | 1 mm (Below Liquid Surface) | Determines the height of the tip position (in millimeters) in the well during aspiration. The available options for the tip positions are:
Choose this option to specify the tip position under the detected liquid surface level.
Choose this option to specify a tip position above the bottom of the well.
*Available when you select the Above Bottom of Well option. |
Tip Change | Pick New Tips For Each Aspiration | Determines whether the FLO i8 system will use new tips or reuse the existing tips for each aspiration in the current protocol execution. The available options are:
Select this option to eject the current tips, and use new tips for each aspiration.
Select this option to reuse the same tips for repeated transfers from the same source well. Up to 8 tips may be used to allow for multiple channels to function in parallel to optimize runtime while saving on tips.
Select this option to reuse the same tip for repeated transfers from the same liquid source. Only a single tip will be used for each source well.
Select this option to keep using the same tips from the previous transfer for each aspiration. |
Return Tips to Tip Box | Disable | Enable this option to always eject the current tips to the waste bin at the end of the dispense process. |
Dispense
Option | Default Settings | Description |
Tip Position | 1 mm (Below Liquid Surface) | Determines the height of the tip position (in millimeters) in the well during dispense. The available options for the tip positions are:
Choose this option to specify the tip position relative to the liquid surface level in the well.
Choose this option to specify the tip position above the bottom of the well.
*Available when you select the Above Bottom of Well option. |
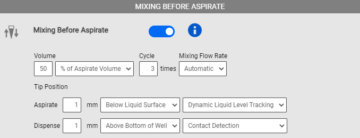
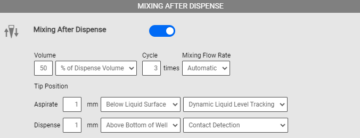
The Mixing settings allow for configuring parameters for mixing either before or after the dispense.
Mixing Before Aspirate
Option | Default Settings | Description |
Mixing Before Aspirate | Disable | Determines the FLO i8 system to mix the liquid before aspirating it by defining the following settings:
Note: Sample mixing in FLO i8 is performed by aspirating and then dispensing the indicated volume. One mixing cycle refers to one complete aspiration and dispense process. |
Tip Position* | Aspirate: 1 mm (Below Liquid Surface - Dynamic Liquid Level Tracking) | Determines the tip position in the well during mixing before aspirate. The available options for the tip positions are:
Choose this option to start with a tip position {1 mm} under the liquid surface in the well.
Choose this option to set the tip position {1 mm} above the well bottom. During mixing before aspirate, there are also options for tip position you can choose in aspirate and dispense:
Note: The value in brackets is the default value used by the FLO i8 system, which is 1 mm. This value can be changed. |
Dispense: 1 mm (Above Bottom of Well - Contact Detection) |
*Available when the Mixing Before Aspirate option is Enabled.
**Available when you select the Above Bottom of Well option.
Mixing After Dispense
Option | Default Settings | Description |
Mixing After Dispense | Disable | Determines the FLO i8 system to mix the liquid after dispensing it by defining the following settings:
Note: Sample mixing in FLO i8 is performed by aspirating and then dispensing the indicated volume. One mixing cycle refers to one complete aspiration and dispense process. |
Tip Position* | Aspirate: 1 mm (Below Liquid Surface - Dynamic Liquid Level Tracking) | Determines the tip position in the well during mixing after dispense. The available options for the tip positions are:
Choose this option to start with a tip position {1 mm} under the liquid surface in the well.
Choose this option to set the tip position {1 mm} above the well bottom. During mixing after dispense, there are also options for tip position you can choose in aspirate and dispense:
Note: The value in brackets is the default value used by the FLO i8 system, which is 1 mm. This value can be changed. |
Dispense: 1 mm (Above Bottom of Well - Contact Detection) |
*Available when the Mixing After Dispense option is Enabled.
**Available when you select the Above Bottom of Well option.
The Optimization tab defines the pipetting tip parameters during the aspiration and dispense process to optimize the liquid transfer to the destination labware.
Aspirate
Option | Default Settings | Description |
Trailing Air Gap | Disable | Enable this option to aspirate air into the pipette tip after the liquid aspiration has finished. This option is useful to prevent the liquid from dripping and ensure more accurate dispense, especially when you are using volatile liquid. Set the amount of Air Gap Volume in μL in the provided field, to be aspirated after the liquid aspiration process has been completed. |
Over Aspirate | Disable | Enable this option to aspirate extra liquid volume. This option is useful especially when you use viscous liquids, and can help ensure dispense accuracy. Set the amount of the extra volume in μL to be aspirated in the Extra Volume box. |
Dispense
Option | Default Settings | Description |
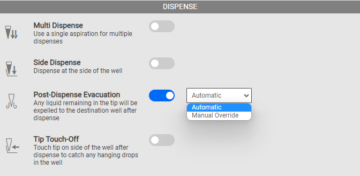
Multi Dispense | Disable | Enable this option to allow the FLO i8 system to perform a single aspiration, and then dispense into multiple destinations. This feature is useful to reduce tip use and save time in your experiment. The Multi Dispense option will be automatically disabled if the Mixing After Dispense option under the Mixing tab is enabled. |
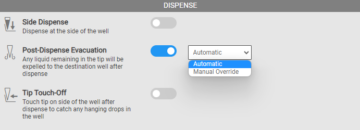
Side Dispense | Disable | Determines the tip position during dispense, at the side of well when it is enabled or centered in the well when it is disabled. |
Post-Dispense Evacuation | Enable | This option allows the FLO i8 system to pressurize the pipetting tip after dispensing, ensuring that all liquid in the tip has been completely evacuated from the tip. The available options are:
Select this option to enable the system to automatically define the volume of air flowing after dispense.
Choose this option if you want to manually define the offset position in millimeters and air volume in μL for evacuation. Important: For more accurate dispense, keep this option enabled, when the Side Dispense option is disabled. |
Tip Touch-Off | Disable | This option enables the pipette tip to touch the side of the well to ensure that there is no hanging drop in the tip. You can also type the amount of time in seconds in the provided field. This allows the FLO i8 system to wait before retracting the channel after tip touching-off. |
The Advanced tab defines the default pipetting tip parameters to detect and track the liquid level during the aspiration and dispense process.
Aspirate
Option | Default Settings | Description |
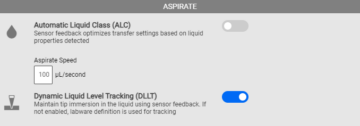
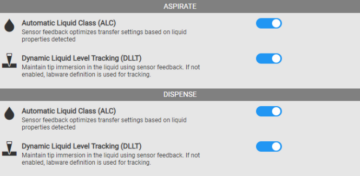
Automatic Liquid Class (ALC) | Enable | Determines the pipetting flow rate in μL/second based on the liquid properties to optimize the transfers during the aspirate process. Disable this option to allow the manual flow rate setup during the aspirate process by modifying the Aspirate Speed in the provided field. |
Dynamic Liquid Level Tracking (DLLT) | Enable | This option enables the Dynamic Liquid Level Tracking (DLLT) settings, which allows the FLO i8 to automatically detect the liquid surface in order to optimize transfers during the aspirate process. If this option is disabled, the FLO i8 will automatically use the labware definition for liquid level tracking. |
Dispense
Option | Default Settings | Description |
Automatic Liquid Class (ALC) | Enable | Determines the pipetting flow rate in μL/second based on the liquid properties to optimize the transfers during the dispense process. Disabled this option to allow the manual flow rate setup during the aspirate process by modifying the Aspirate Speed in the provided field. |
Dynamic Liquid Level Tracking (DLLT) | Enable | This option enables the Dynamic Liquid Level Tracking (DLLT) settings, which allows the FLO i8 to automatically detect the liquid surface in order to optimize transfers during the dispense process. If this option is disabled, the FLO i8 will automatically use the labware definition for liquid level tracking. |
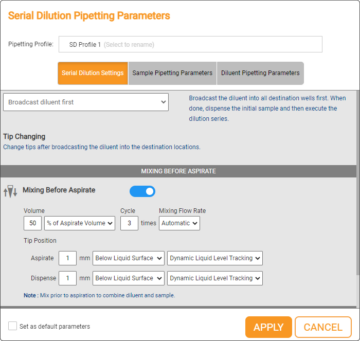
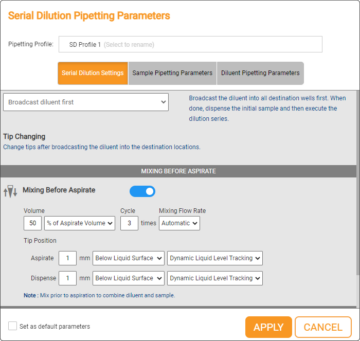
The Serial Dilution Settings define the order of the sample and diluent volumes, as well as the mixing configurations during the transfers.
Option | Default Settings | Description |
Serial Dilution Method | Broadcast diluent first | Determines the order for the dispensing of sample and diluent liquid in the destination labware. The available options are:
Choose this option to aspirate and dispense the sample stock first, then dispense the diluent stock to each destination location accordingly. The FLO i8 will eject the tips to the waste tray after dispensing both sample and diluent into the destination locations.
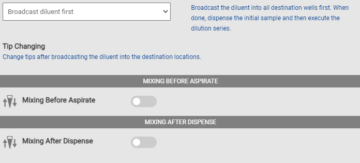
Choose this option to dispense the diluent stock to all destination locations first, then dispense the sample to the locations of the mapped diluent stocks. If you select this option, the FLO i8 will automatically eject the tips to the waste tray after broadcasting the diluent and change to new tips to dispense the sample. |
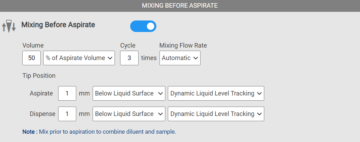
Mixing Before Aspirate
Option | Default Settings | Description |
Mixing Before Aspirate | Disable | Determines the FLO i8 system to mix the liquid before aspirating it by defining the following settings:
Note: Sample mixing in FLO i8 is performed by aspirating and then dispensing the indicated volume. One mixing cycle refers to one complete aspiration and dispense process. |
Tip Position* | For both Aspirate and Dispense settings: 1 mm (Below Liquid Surface - Dynamic Liquid Level Tracking | Determines the tip position in the well during mixing before aspirate. The available options for the tip positions are:
Choose this option to start with a tip position {1 mm} under the liquid surface in the well.
Choose this option to set the tip position {1 mm} above the well bottom. During Mixing Before Aspirate, there are also options for tip position you can choose both in aspirate and dispense:
Note: The value in brackets is the default value used by the FLO i8 system, which is 1 mm. This value can be changed. |
*Available when the Mixing Before Aspirate option is Enabled.
**Available when you select the Above Bottom of Well option.
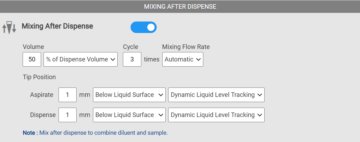
Mixing After Dispense
Option | Default Settings | Description |
Mixing After Dispense | Disable | Determines the FLO i8 system to mix the liquid after dispensing it by defining the following settings:
Note: Sample mixing in FLO i8 is performed by aspirating and then dispensing the indicated volume. One mixing cycle refers to one complete aspiration and dispense process. |
Tip Position* | For both Aspirate and Dispense settings: 1 mm (Below Liquid Surface - Dynamic Liquid Level Tracking | Determines the tip position in the well during mixing after dispense. The available options for the tip positions are:
Choose this option to start with a tip position {1 mm} under the liquid surface in the well.
Choose this option to set the tip position {1 mm} above the well bottom. During mixing after dispense, there are also options for tip position you can choose in aspirate and dispense:
Note: The value in brackets is the default value used by the FLO i8 system, which is 1 mm. This value can be changed. |
*Available when the Mixing After Dispense option is Enabled.
**Available when you select the Above Bottom of Well option.
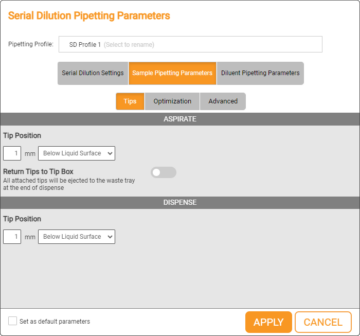
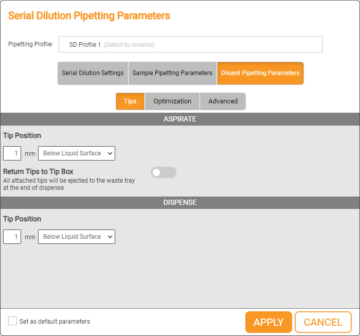
Sample and Diluent Pipetting Parameters defines the pipetting parameters of the sample and diluent volume during transfer. There are three tabs in the Sample Pipetting Parameters and Diluent Pipetting Parameters settings: Tips, Optimization, and Advanced.
- Tips
The parameters in the Tips tab allows for configuring tip position based on your application needs during sample or diluent transfers.
Aspirate
Option | Default Settings | Description |
Tip Position | 1 mm (Below Liquid Surface) | Determines the height of the tip position (in millimeters) in the well during aspiration. The available options for the tip positions are:
Choose this option to specify the tip position under the detected liquid surface level.
Choose this option to specify a tip position above the bottom of the well.
*Available when you select the Above Bottom of Well option. |
Return Tips to Tip Box | Disable | Enable this option to always return the current tips to the tip box at the end of the dispense process. |
Dispense
Option | Default Settings | Description |
Tip Position | 1 mm (Below Liquid Surface) | Determines the height of the tip position (in millimeters) in the well during dispense. The available options for the tip positions are:
Choose this option to specify the tip position under the detected liquid surface level in the well.
Choose this option to specify the tip position above the bottom of the well.
*Available when you select the Above Bottom of Well option. |
- Optimization
The Optimization tab defines the pipetting tip parameters during the aspiration and dispense process to optimize sample or diluent transfer to the destination labware.
Aspirate
Option | Default Settings | Description |
Trailing Air Gap | Disable | Enable this option to aspirate air into the pipette tip after the liquid aspiration has finished. This option is useful to prevent the liquid from dripping and ensure more accurate dispense, especially when you are using volatile liquid. Set the amount of Air Gap Volume in μL in the provided field, to be aspirated after the liquid aspiration process has been completed. |
Over Aspirate | Disable | Enable this option to allow the FLO i8 system to aspirate more liquid volume. This option is useful, especially when you use viscous liquids, and can help ensure dispense accuracy. Set the amount of the extra volume in μL to be aspirated in the Extra Volume box. |
Dispense
Option | Default Settings | Description |
Side Dispense | Disable | Determines the tip position during dispense.Liquid is dispensed at the side of a well when it is enabled otherwise the tips are centered in the well when it is disabled. |
Post-Dispense Evacuation | Enable | This option allows the FLO i8 system to pressurize the pipetting tip after dispensing, ensuring that all liquid in the tip has been completely evacuated from the tip. The available options are:
Choose this option to allow the system to automatically dispense air without first defining the air volume.
Choose this option if you want to manually define the offset position in millimeters and air volume for dispense in μL. Important: For more accurate dispense, keep this option enabled, when the Side Dispense option is disabled. |
Tip Touch-Off | Disable | This option enables the pipette tip to touch the side of the well to ensure that there is no hanging drop in the tip. You can also enter the amount of time in seconds in the provided field. This allows the FLO i8 system to wait before retracting the channel after tip touch-off. |
- Advanced
The Advanced tab defines the default pipetting tip parameters to detect and track the liquid level during the aspiration and dispense process.
Aspirate
Option | Default Settings | Description |
Automatic Liquid Class (ALC) | Enable | Determines the pipetting flow rate in μL/second based on the liquid properties to optimize the transfers during the aspirate process. Disable this option to allow the manual flow rate setup during the aspirate process by modifying the Aspirate Speed in the provided field. |
Dynamic Liquid Level Tracking (DLLT) | Enable | This option enables the Dynamic Liquid Level Tracking (DLLT) settings, which allows the FLO i8 to automatically detect the liquid surface in order to optimize transfers during the aspirate process. If this option is disabled, the FLO i8 will automatically use the labware definition for liquid level tracking. |
Dispense
Option | Default Settings | Description |
Automatic Liquid Class (ALC) | Enable | Determines the pipetting flow rate in μL/second based on the liquid properties to optimize the transfers during the dispense process. Disabled this option to allow the manual flow rate setup during the aspirate process by modifying the Aspirate Speed in the provided field. |
Dynamic Liquid Level Tracking (DLLT) | Enable | This option enables the Dynamic Liquid Level Tracking (DLLT) settings, which allows the FLO i8 to automatically detect the liquid surface in order to optimize transfers during the dispense process. If this option is disabled, the FLO i8 will automatically use the labware definition for liquid level tracking. |
Managing and Modifying the Existing Profile
In this section, you will learn how to create a new profile and manage the existing profiles.
Important: Modifying the existing profiles are disabled for the run-only users. Consult with your Administrator for further information on the user account access.
To manage and modify the existing profile:
Choose from the following options to add a new profile, modify a profile, and manage the existing profiles:
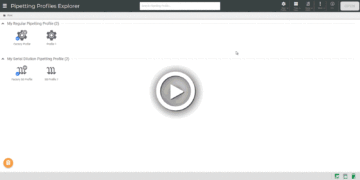
- In the Pipetting Profiles Explorer page, click the New Profile button
 .
. - Select the profile category from the following options:
- Regular Profile
- Select the Regular Profile option if you want to create a profile with pipetting parameter settings for Simple Transfer.
- Then, in the Pipetting Parameters settings, type a profile name in the Pipetting Profile name field, and define the pipetting settings under the Tips, Mixing, Optimization, and/or Advanced tabs based on your preferences.
- Serial Dilution Profile
- Select the Serial Dilution Profile option if you want to create a profile with pipetting parameter settings for Serial Dilution.
- Then, in the Serial Dilution Pipetting Parameters settings, type a profile name in the Pipetting Profile name field, and define the serial dilution profile settings under the Serial Dilution Settings, Sample Pipetting Parameters, and/or Diluent Pipetting Parameters tabs based on your preferences.
Important: Changing the pipetting parameters settings of a specific pipetting profile will affect all protocols that use the profile. Please check the corresponding protocols before modifying the parameters.
- In the Pipetting Profiles Explorer page, select a profile you want to modify and click OPEN. For quicker access, double click on the selected profile.
- Rename the pipetting profile in the Pipetting Profile name field. Under each tab, modify the settings you wish to change.
Note: To change the pipetting parameter settings, see Understanding Each Option in the Regular Pipetting Parameters Menu and Understanding Each Option in the Serial Dilution Pipetting Parameters Menu.
- Click APPLY when you’re done.
- Choose from the following options to manage your pipetting profiles.
- Click the View Options button
 to switch between Tiles, Lists, or Details view on how to display the profiles in the Pipetting Profiles Explore page.
 - Click the Sort By button
 to sort the pipetting profile names alphabetically, or by date modified.
 - Click the More Options button
 to manage the selected profiles by the following tasks:
- Click the View Options button
 Duplicate - Select this option to duplicate one or more pipetting profiles in the Pipetting Profiles Explorer page.
 Rename - Click this option to rename a selected profile.
 Send a Copy - This button allows you to send a copy of a single or multiple selected profiles to other registered users in the FLO i8 system.
 Remove - This allows you to remove one or more profiles in the Pipetting Profiles Explorer page.
 Download - Select this option to download the selected profile(s) into a .ZIP folder.
 Upload - Click this option to import a profile from your local drive.
 Info - Click this button to see the profile information (owner, type, and where the pipetting parameters applied to) of a selected pipetting profile in the Pipetting Profiles Explorer page.
FORMULATRIX® is proudly powered by WordPress
