Registering a Plate with Cells via Cellmatic Suite
Prerequisites:
- Connect your barcode printer to Cellmatic Suite or use prebarcoded plates.
- Define labware and cell lines in the Library.
- Prepare the plates with cells.
- Perform an aseptic technique when loading and unloading plates with cells.
- Wear Personal Protective Equipment (PPE).
- Use 70% ethanol to disinfect gloves, labware, and tools.
To Register a Plate with Cells via Cellmatic Suite
Registering Plate with Cells
- Go to Consumables > Inventory > REGISTER. A Select Labware window should appear on the screen.
- Select an SBS well plate—one, four, eight, 24-, 96-, or 384-wells—and select OK.
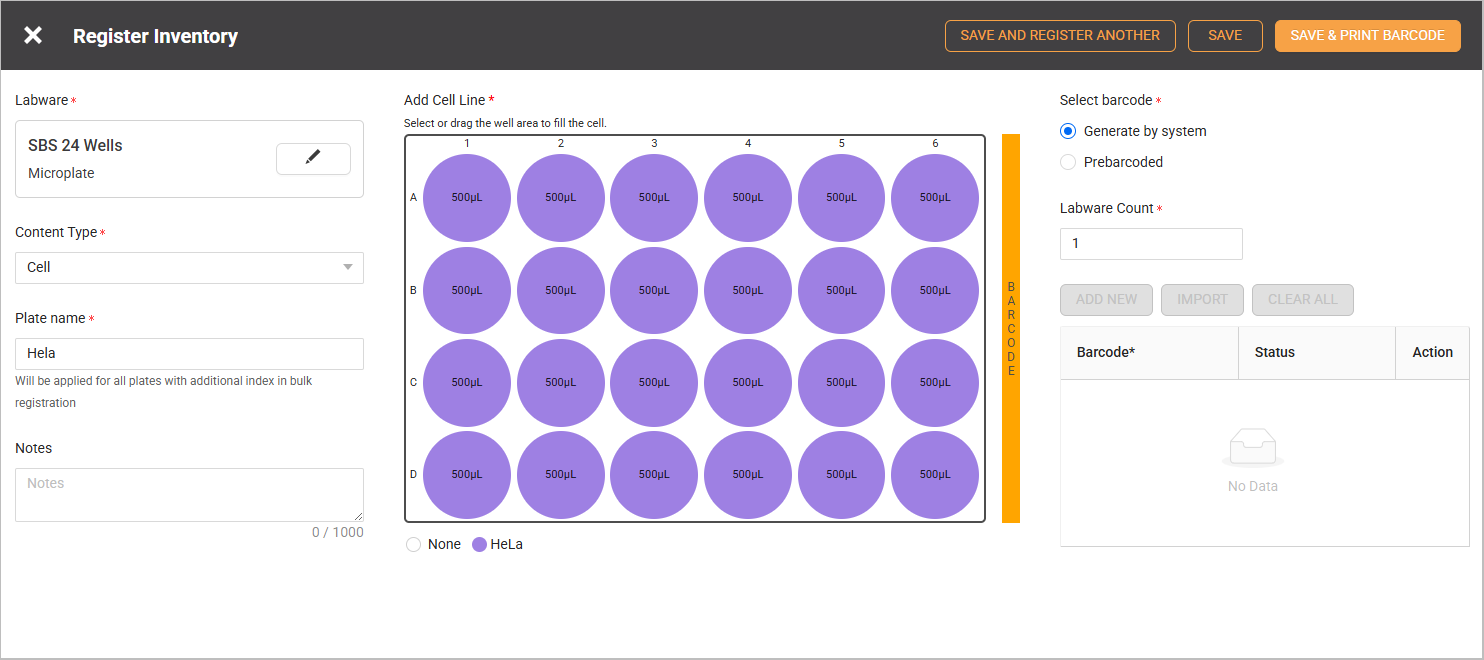
- In the Content Type dropdown, select Cell.
- Write a descriptive name for your plate in the Plate Name field.
Note: The plate name, along with an additional index, is applied to each plate during the bulk registration process.
- Add a cell line.
- Select ADD to fill the cell to the well area. An Add Content window should appear on your screen.
- Select the cell line name on the left table.
- Define the volume for the cell line.
- Select the wells to fill with cells.
- Select OK to proceed.
Note:
- Use Stamp button
 to fill the wells and Eraser button
  to remove the content from the well.
 - Each SBS well plate has a specific volume range. Make sure to fill the volume within this range.

Select the Cell Line Name and Define the Volume
- Optional: Write any additional information about the labware or cells in the Notes box.
- Select the barcode from the following options:
- Generate by system
Select this option if your plate needs to be barcoded. The system will generate a barcode and identify it automatically as you load it.Upon choosing this option, the Labware Count field will be available. You must define the number of labware if you register several plates with cells with identical cell line configurations. - Prebarcoded
Select this option if your plate has barcodes. You can add barcodes manually using ADD NEW or upload them in bulk from a CSV file using IMPORT.Note: The CSV file must have “Barcodes” in A1, followed by the barcode entries, as shown in the image below.

CSV Format to Upload Bulk Barcode Entries
- Generate by system
- Select one of the options below to complete the labware registration process.
Note: Choosing "SAVE & REGISTER ANOTHER" or "SAVE" during the registration of plates with cells will not prompt the system to print barcodes.
- SAVE & REGISTER ANOTHER: Select this option to store the current plate and register an additional plate immediately.
- SAVE: Select this option to store the current plate.
- SAVE & PRINT BARCODE: Select this option to store the plate and print the barcode. It is only available for barcodes that are generated by the system.
- Read the pop-up message and select OK to close it.
