Adding and Removing Plates
This section explains how to properly add plates to the ROCK IMAGER® and how to remove them safely.
Jump to:
Adding Plates
Before you can tell ROCK IMAGER® to image your plates, you must first properly add your plates to the system. This process includes manually inserting plates to the Load Port and scanning the barcode of each plate, which is done automatically by ROCK IMAGER®. Follow the tutorial below to add new plates.
Prerequisites:
- You have created an experiment in ROCK MAKER. If you aren’t interested in tracking conditions with ROCK MAKER, you can create a proxy experiment to expedite the imaging process.
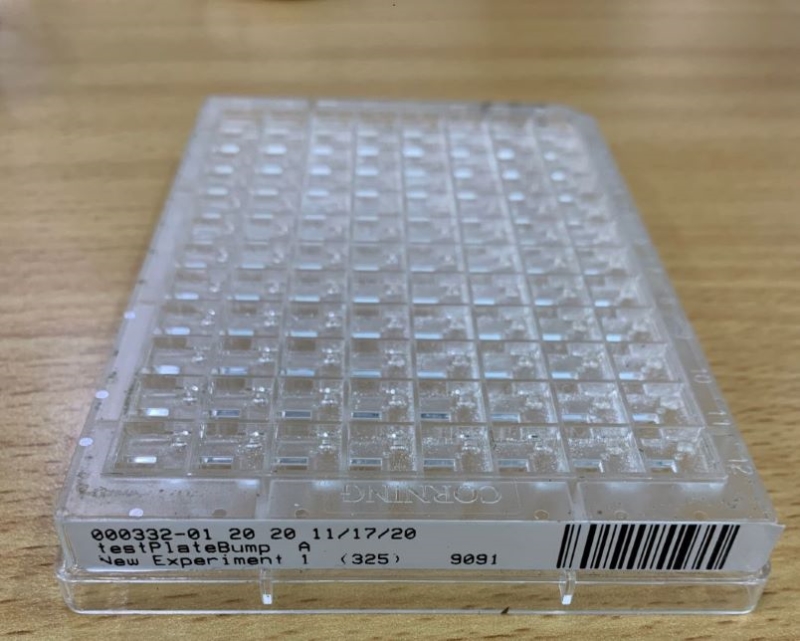
- Your plate has a barcode label affixed to the short side of the plate opposite the A1 position. See image below for reference.
To add a plate to ROCK IMAGER®:
- Open the Load Port door.
- Place the plates into the available Load Port slots. Plates should be inserted sideways with the barcode facing the PSR hand (your right side). Plates can be inserted into any slot, in any order.
- Close the Load Port door with a gentle nudge. When the door is properly closed, the Load Port Door in the Status Bar will say Closed. At this point, the system will scan the new plates. If it’s successful, the plate information will appear in the Load Port tab of the Plate menu and the Status column will say Active.
- Now you can choose from the following options:
- If you want to move all plates to Storage, click Store Content in the upper-right corner of the screen. Moving plates to Storage is recommended to preserve your samples as it has a greater temperature control. To move specific plates to Storage, check the boxes next to the desired plates. Then, click Move Plate To and select Storage.
Tip: Click Store Active Content if there are expired plates in the Load Port that haven’t been removed from the system. This will tell ROCK IMAGER® to store only plates that have on-going imaging schedules (the Status column says Active).
-
- If you want to inspect a plate’s content, select the plate of interest and click Move Plate To. Then, select Vis-UV Imager. Read Viewing A Plates Content for more information.
- If you want ROCK IMAGER® to image a plate immediately, so you can view, score, and annotate those images in ROCK MAKER, select the desired plate. Then, click Image Now. Read, Initiating an On-Demand Imaging Session for more information.
Removing Plates
Important: Do NOT attempt to physically reach inside the ROCK IMAGER® to remove a plate from anywhere other than the Load Port.
When all of the imaging schedules for a certain plate have been completed, you can remove the plate from Storage. Multiple plates can be moved at the same time from Storage to the Load Port, where you can then safely take them out to be stored outside ROCK IMAGER®. Follow the tutorial below to learn how to safely remove a plate.
Tip: You can look at the Status column and search for plates with Expired status to find out which plates need to be removed from the system. When a plate has Expired status, that means all its imaging schedules have been completed.
Prerequisite:
- You have an empty slot(s) in the Load Port. For example, if 5 plates are to be moved from Storage, there must be 5 empty slots in the Load Port. To make room, you can either move the plates in the Load Port to Storage or take them out, as needed.
To remove a plate from ROCK IMAGER®:
- In the Search tab of the Plate menu, select the plate(s) of interest. To move multiple plates at once, check the checkboxes next to each of the desired plates.
- In the command panel that appears, click Move Plate To and select Load Port Hotel. Wait for a few moments while ROCK IMAGER® moves the plates from Storage to Load Port. Click the Load Port tab and the plates should be there now.
- Open the Load Port door. Remove the plates from it and close the door.
Frequently Asked Questions:
➤ Why are my plates not showing up in the Load Port tab when ROCK IMAGER® has finished scanning their barcodes?
Answer: This may be because there is incomplete plate information or because the barcode label is not properly affixed to the plate. Go to the Plate Status webhelp page for more information about possible plate statuses.
➤ What happens if I want to remove multiple plates from Storage but there aren’t enough slots in the Load Port?
Answer: If the Load Port is full, the plates to be removed will wait in the Storage and will automatically be moved to the Load Port when slots become available.
Related Topics
FORMULATRIX® is proudly powered by WordPress


