Skip to content
formulatrix-logo

µPULSE V2.4

  • What’s New in µPULSE® 2.4
  • Software Overview
  • User Manual
    • User Manual – English Version
    • User Manual – French Version
  • Hardware Overview
    • Hardware Overview
    • Specifications
  • Tutorials
    • Setting up the Manual Profile
    • Concepts
    • Setting Up µPULSE
    • Designing Profiles
      • Running a Profile
      • Setting Up Auto Profile
  • Administrative Tasks
    • Applying Previous Volume Sensor Calibration Result
    • Downloading LOGS
    • Monitoring the µPULSE Status from an External Device
    • Configuring System Settings
    • Calibrating the Volume Sensor
  • Maintenance
    • µPULSE Filtration Chip Manual
    • Updating µPULSE Software
  • FAQs & Troubleshooting
    • FAQs
    • Troubleshooting
      • Common Errors and Warning Messages
      • Fixing Silicone Seals and Chip Leakage
      • Fixing Volume Sensor Issues
      • Fixing Device Connection Issues

µPULSE V2.1

  • Software Overview
  • Hardware Overview
    • Specifications
  • Tutorials
    • Setting up the Manual Profile
    • Concepts
    • Setting Up µPULSE
    • Designing Profiles
      • Creating a Profile
      • Running a Profile
      • Setting Up Auto Profile
  • Administrative Tasks
    • Applying Previous Volume Sensor Calibration Result
    • Downloading LOGS
    • Monitoring the µPULSE Status from an External Device
    • Configuring System Settings
    • Calibrating the Volume Sensor
  • Maintenance
    • µPULSE Filtration Chip Manual
    • Updating µPULSE Software
  • FAQs & Troubleshooting
    • FAQs
    • Troubleshooting
      • Common Errors and Warning Messages
      • Fixing Silicone Seals and Chip Leakage
      • Fixing Volume Sensor Issues
      • Fixing Device Connection Issues
  • Home
  • Docs
  • µPULSE® TFF
  • µPULSE V2.1
  • Tutorials
  • Designing Profiles
  • Setting Up Auto Profile

Setting Up Auto Profile

The µPULSE allows you to create a profile consisting of desired experiment settings for concentrating sample or performing buffer exchange. The system tracks volume as it runs sequences based on the values you have entered when designing a profile.

To set up a new profile, tap AUTO PROFILE on the Home Screen. Then choose between these 3 options:

  • Tap the CONCENTRATE tab if you want to concentrate a sample 50 mL or less.
  • Tap the CONCENTRATE > 50 ML tab if you want to concentrate more than 50 mL of sample.
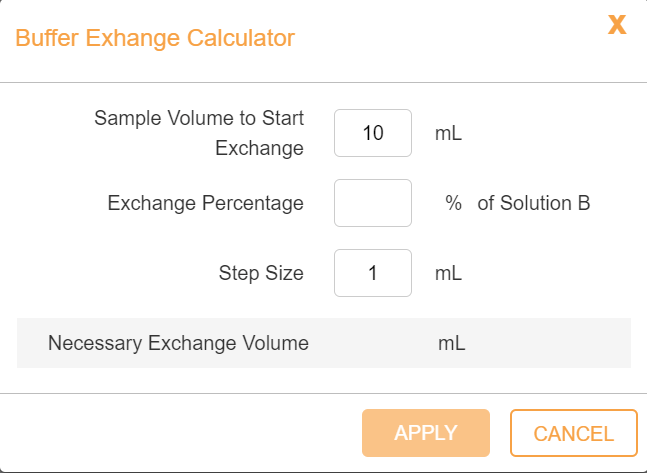
  • Tap the BUFFER EXCHANGE tab if you want to exchange buffer solution for another from the buffer (right) tube. The reagent type can be the same or different as the carrier reagent.
AUTO PROFILE Menu
AUTO PROFILE Menu

Tip: Tap the Help buttonHelp Button to get acquainted with the software and learn about what you can do in the AUTO PROFILE menu.

Creating a New Profile

  1. Tap AUTO PROFILE on the Home Screen and select one of the options:
    To create and run a concentrate profile, follow the instructions below:
Concentrate Expand
  1. From the CONCENTRATE tab, enter the Starting Volume and the Starting Concentration, then the Final Volume OR the Final Concentration.

    Note: The final concentration or final volume will be calculated based on the other inputs.


  1. Select the Membrane Cut-Off Size. Then, continue to step 2.

    Setting up the Concentrate Profile

    Setting up the Concentrate Profile

Concentrate > 50 ML Expand
  1. Tap the CONCENTRATE > 50 ML tab.
  2. Fill in the parameters for Starting Volume in Tube 01 and 02, then the Final Volume.
  3. Then, continue to step 2.
Buffer Exchange Expand
  1. Select the BUFFER EXCHANGE tab. Input the Starting Volume and Final Volume. The rest of the parameters will adjust automatically.

    The Buffer Exchange Setup Menu

    The Buffer Exchange Setup Menu

  2. Click on the exchange volume calculator and select the extent of the buffer exchange by inputting the percentage required. It will calculate the volume of the Buffer B required for the exchange.

    Buffer Exchange Calculator

    Buffer Exchange Calculator

  3. The step size indicates the volume of buffer B exchanged at each step. You can reduce this volume according to the requirement.
  4. Continue to step 2 to load the saved profile for buffer exchange.
  1. Click the ADVANCED SETUP EXPLORER to change the pressure settings.
  2. Click EDIT to change settings.
      • In the General Setup tab, the Safety Threshold can be adjusted. You can also choose the priming option between BUFFER or SAMPLE and define the Priming Volume.
      • Click the CYCLE SETUP tab to to adjust the diaphragm pressure, return valve pressure, and fill/empty time.

Note: Tap the Edit Edit Button button to adjust Return Valve Pressure.

Advanced Setup Menu
  1. Tap SAVE SETUP AS to save the customized settings.
  2. Click LOAD SETUP to use the saved settings.


Related Topics

  • Setting Up µPULSE
  • Software Overview
  • Running a Profile
µPULSE 2.1, µPULSE 2.4
Updated on May 3, 2024

FORMULATRIX® is proudly powered by WordPress

Scroll To Top